• 版块
  • 最新
  • 标签
皮肤
  • Light
  • Cerulean
  • Cosmo
  • Flatly
  • Journal
  • Litera
  • Lumen
  • Lux
  • Materia
  • Minty
  • Morph
  • Pulse
  • Sandstone
  • Simplex
  • Sketchy
  • Spacelab
  • United
  • Yeti
  • Zephyr
  • Dark
  • Cyborg
  • Darkly
  • Quartz
  • Slate
  • Solar
  • Superhero
  • Vapor

  • 默认(不使用皮肤)
  • 不使用皮肤
折叠

Orillusion

2

在线

550

用户

171

主题

456

帖子

顶点格式下的offset: 怎么理解?

已定时 已固定 已锁定 已移动 中文社区
webgpu
6 帖子 2 发布者 172 浏览
    • 从旧到新
    • 从新到旧
    • 最多赞同
回复
  • 在新帖中回复
登录后回复
此主题已被删除。只有拥有主题管理权限的用户可以查看。
  • 支阿怪支 离线
    支阿怪支 离线
    支阿怪
    写于 最后由 shuangliu 编辑
    #1

    f31699df-3253-472c-8fea-4af443831042-image.png

    ea8a95e8-62c6-4326-b8b8-652380451881-image.png
    规范只说明是format最小倍数?这个成员定义有何意义,为实现什么呢?

    没有捷径,自发光芒

    1 条回复 最后回复
    0
  • shuangliuS 离线
    shuangliuS 离线
    shuangliu
    写于 最后由 shuangliu 编辑
    #2

    offset 用来标识 attributes 的偏移量,你的另一个帖子中
    https://forum.orillusion.com/topic/28/关于setvertexbuffer-插槽的理解
    用 setVertexBuffer(index, vertexBufer) 根据不同的 index 可以在vertex shader 中设置不同的 location 插槽,这是一种做法,调用多次 setVertexBuffer 设置不同插槽

    除了设置不同的index,我们还可以通过一次 setVertexBuffer 直接把所有顶点相关信息一次性提交,效率更高,比如一般常规来说,我们的geometry信息会包含 position、normal或color、uv三种信息,那么可以直接设置一个大的buffer:

    const cubeVertexArray = new Float32Array([
      // float4 position, float4 color, float2 uv,
      1, -1, 1, 1,   1, 0, 1, 1,  1, 1,
      -1, -1, 1, 1,  0, 0, 1, 1,  0, 1,
      -1, -1, -1, 1, 0, 0, 0, 1,  0, 0,
      ...... // 省略篇幅
      1, 1, -1, 1,   1, 1, 0, 1,  1, 0,
      1, -1, -1, 1,  1, 0, 0, 1,  1, 1,
      -1, 1, -1, 1,  0, 1, 0, 1,  0, 0,
    ]);
    

    那么在pipeline创建时可以通过 offset 指定buffer的偏移量用来标识不同的插槽属性:

    const renderPipeline = this.device.createRenderPipeline({
        vertex: {
            module:  vertexShader,
            entryPoint: 'main',
            buffers: [{
                arrayStride: 10 * 4, // 标明每 10 个值一组数据
                attributes: [
                    {
                        // position
                        shaderLocation: 0, // 插槽index
                        offset: 0, // 偏移量 0
                        format: 'float32x4',  // 标明4个 float32 position
                    },
                    {
                        // color
                        shaderLocation: 1, // 插槽index
                        offset: 4 * 4, // 偏移量 4
                        format: 'float32x4', // 标明 4 个 float32 color
                    },
                    {
                        // uv
                        shaderLocation: 2, // 插槽index
                        offset: 8 * 4, // 偏移量 8
                        format: 'float32x2',  // 标明 2 个 float32 uv
                    }
                ],
            }]
        },
        ....  // 省略
    })
    

    那么只需设置一次vertexbuffer

    const verticesBuffer = device.createBuffer({
        size: cubeVertexArray.byteLength,
        usage: GPUBufferUsage.VERTEX,
        mappedAtCreation: true,
    });
    new Float32Array(verticesBuffer.getMappedRange()).set(cubeVertexArray);
      verticesBuffer.unmap();
    
    ... // 省略
    
    passEncoder.setVertexBuffer(0, verticesBuffer);
    

    在shader中,就可以通过offset调用不同的location:

    [[stage(vertex)]]
    fn main([[location(0)]] position : vec4<f32>,
            [[location(1)]] color : vec4<f32>,
            [[location(2)]] uv : vec2<f32>,
    ) -> VertexOutput {
            ... // 省略
    }
    

    这种做法效率更高一些,做高性能的 webgpu 程序要尽可能减少不必要的command次数 和 gpu 数据交换次数,所以:

    1. 减少setVertexBuffer 的次数,把所有相关信息一次提交,要比多次设置index快很多
    2. 在数据层面,创建一个gpubuffer,要比创建多个零散的gpubuffer效率高很多,减少cpu与gpu的交换数据次数,也减少了GPU在内部命中内存的速度,这个的提升也很重要。
    支阿怪支 2 条回复 最后回复
    2
  • 支阿怪支 离线
    支阿怪支 离线
    支阿怪
    在 中回复了 shuangliu 最后由 编辑
    #3

    @shuangliu 非常感谢解答👍

    没有捷径,自发光芒

    1 条回复 最后回复
    0
  • 支阿怪支 离线
    支阿怪支 离线
    支阿怪
    在 中回复了 shuangliu 最后由 编辑
    #4

    @shuangliu 还有个问题请教,就是怎么理解计算buffer的偏移量呢?0、4、8这是怎么得出的呢?

    没有捷径,自发光芒

    shuangliuS 1 条回复 最后回复
    0
  • shuangliuS 离线
    shuangliuS 离线
    shuangliu
    在 中回复了 支阿怪 最后由 shuangliu 编辑
    #5

    @wenhao0807 这个是根据你自己的vertex设置安排的

    const cubeVertexArray = new Float32Array([
      // float4 position, float4 color, float2 uv,
      1, -1, 1, 1,   1, 0, 1, 1,  1, 1,
      -1, -1, 1, 1,  0, 0, 1, 1,  0, 1,
      -1, -1, -1, 1, 0, 0, 0, 1,  0, 0,
      ...... // 省略篇幅
      1, 1, -1, 1,   1, 1, 0, 1,  1, 0,
      1, -1, -1, 1,  1, 0, 0, 1,  1, 1,
      -1, 1, -1, 1,  0, 1, 0, 1,  0, 0,
    ]);
    

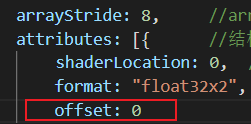
    这个例子中,一行10个数字,你可以安排排列方式,1-4 是position, 5-8 是 color或者一般设置normal,9-10是uv值,相应的就是 pipeline 中的 offset。
    一般来说,对于普通object/mesh,我们一般用8个值做顶点buffer,3个 position, 3个normal, 2个uv:

    buffers: [
        {
            arrayStride: 8 * 4,
            attributes: [
                {
                    // position
                    shaderLocation: 0,
                    offset: 0,
                    format: 'float32x3',
                },
                {
                    // normal
                    shaderLocation: 1,
                    offset: 3 * 4,
                    format: 'float32x3',
                },
                {
                    // uv
                    shaderLocation: 2,
                    offset: 6 * 4,
                    format: 'float32x2',
                }
            ],
        }
    ]
    

    其他信息,比如transform,color,light,material等参数会用 uniform/storage buffer进行传递。当然你可以自行安排,比如对于lines/points,就不需要normal或者uv,那vertexbuffer中就会设置color

    支阿怪支 1 条回复 最后回复
    1
  • 支阿怪支 离线
    支阿怪支 离线
    支阿怪
    在 中回复了 shuangliu 最后由 编辑
    #6

    @shuangliu 明白了,感谢您的回复👍

    没有捷径,自发光芒

    1 条回复 最后回复
    0

Copyright © 2023 Orillusion | Contact US

  • 登录

  • 没有帐号? 注册

  • 登录或注册以进行搜索。
  • 第一个帖子
    最后一个帖子
0
  • 版块
  • 最新
  • 标签
  • 登录

  • 没有帐号? 注册

  • 登录或注册以进行搜索。