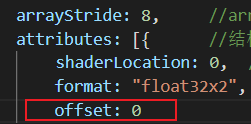
顶点格式下的offset: 怎么理解?
-
offset用来标识attributes的偏移量,你的另一个帖子中
https://forum.orillusion.com/topic/28/关于setvertexbuffer-插槽的理解
用setVertexBuffer(index, vertexBufer)根据不同的index可以在vertex shader 中设置不同的 location 插槽,这是一种做法,调用多次setVertexBuffer设置不同插槽除了设置不同的index,我们还可以通过一次
setVertexBuffer直接把所有顶点相关信息一次性提交,效率更高,比如一般常规来说,我们的geometry信息会包含 position、normal或color、uv三种信息,那么可以直接设置一个大的buffer:const cubeVertexArray = new Float32Array([ // float4 position, float4 color, float2 uv, 1, -1, 1, 1, 1, 0, 1, 1, 1, 1, -1, -1, 1, 1, 0, 0, 1, 1, 0, 1, -1, -1, -1, 1, 0, 0, 0, 1, 0, 0, ...... // 省略篇幅 1, 1, -1, 1, 1, 1, 0, 1, 1, 0, 1, -1, -1, 1, 1, 0, 0, 1, 1, 1, -1, 1, -1, 1, 0, 1, 0, 1, 0, 0, ]);那么在pipeline创建时可以通过
offset指定buffer的偏移量用来标识不同的插槽属性:const renderPipeline = this.device.createRenderPipeline({ vertex: { module: vertexShader, entryPoint: 'main', buffers: [{ arrayStride: 10 * 4, // 标明每 10 个值一组数据 attributes: [ { // position shaderLocation: 0, // 插槽index offset: 0, // 偏移量 0 format: 'float32x4', // 标明4个 float32 position }, { // color shaderLocation: 1, // 插槽index offset: 4 * 4, // 偏移量 4 format: 'float32x4', // 标明 4 个 float32 color }, { // uv shaderLocation: 2, // 插槽index offset: 8 * 4, // 偏移量 8 format: 'float32x2', // 标明 2 个 float32 uv } ], }] }, .... // 省略 })那么只需设置一次vertexbuffer
const verticesBuffer = device.createBuffer({ size: cubeVertexArray.byteLength, usage: GPUBufferUsage.VERTEX, mappedAtCreation: true, }); new Float32Array(verticesBuffer.getMappedRange()).set(cubeVertexArray); verticesBuffer.unmap(); ... // 省略 passEncoder.setVertexBuffer(0, verticesBuffer);在shader中,就可以通过offset调用不同的location:
[[stage(vertex)]] fn main([[location(0)]] position : vec4<f32>, [[location(1)]] color : vec4<f32>, [[location(2)]] uv : vec2<f32>, ) -> VertexOutput { ... // 省略 }这种做法效率更高一些,做高性能的 webgpu 程序要尽可能减少不必要的command次数 和 gpu 数据交换次数,所以:
- 减少
setVertexBuffer的次数,把所有相关信息一次提交,要比多次设置index快很多 - 在数据层面,创建一个gpubuffer,要比创建多个零散的gpubuffer效率高很多,减少cpu与gpu的交换数据次数,也减少了GPU在内部命中内存的速度,这个的提升也很重要。
- 减少
-
@wenhao0807 这个是根据你自己的vertex设置安排的
const cubeVertexArray = new Float32Array([ // float4 position, float4 color, float2 uv, 1, -1, 1, 1, 1, 0, 1, 1, 1, 1, -1, -1, 1, 1, 0, 0, 1, 1, 0, 1, -1, -1, -1, 1, 0, 0, 0, 1, 0, 0, ...... // 省略篇幅 1, 1, -1, 1, 1, 1, 0, 1, 1, 0, 1, -1, -1, 1, 1, 0, 0, 1, 1, 1, -1, 1, -1, 1, 0, 1, 0, 1, 0, 0, ]);这个例子中,一行10个数字,你可以安排排列方式,1-4 是position, 5-8 是 color或者一般设置normal,9-10是uv值,相应的就是 pipeline 中的 offset。
一般来说,对于普通object/mesh,我们一般用8个值做顶点buffer,3个 position, 3个normal, 2个uv:buffers: [ { arrayStride: 8 * 4, attributes: [ { // position shaderLocation: 0, offset: 0, format: 'float32x3', }, { // normal shaderLocation: 1, offset: 3 * 4, format: 'float32x3', }, { // uv shaderLocation: 2, offset: 6 * 4, format: 'float32x2', } ], } ]其他信息,比如transform,color,light,material等参数会用 uniform/storage buffer进行传递。当然你可以自行安排,比如对于lines/points,就不需要normal或者uv,那vertexbuffer中就会设置color


